Camera Phone Shoot-Out
As I mentioned earlier, each of these phones has a very different type of camera. Only the Sanyo has a camera fully built-in to the phone. The rest have separate cameras that can be attached to the camera only when needed. Each type of camera has its own advantages and disadvantages.
Sanyo 5300
The Sanyo's built-in camera is clearly the most convenient. You never have to worry about carrying or losing the camera. You also don't have to fiddle with connecting a separate device when you want to take a picture, which is great for those spur-of-the-moment shots. When you decide you want to take a picture, all you have to do is open the flip, press the dedicated camera button, and press "OK". Starting from when you open the flip, the phone can be ready to take a picture in 3-4 seconds.
Once you're in camera mode, the first thing you notice is how bright and responsive the display is when used as a live viewfinder. I couldn't find a good way to measure it, but my feeling was that the display was updated around 10 times per second, which is plenty for quickly framing photos. The camera also adjusted very well for various lighting conditions (and did so very quickly).
Unlike the other phones, the Sanyo's camera is designed for "portrait" orientation, meaning the images are taller than they are wide. The other cameras are designed primarily for the more traditional "landscape" orientation. The portrait orientation has a number of benefits. First, it makes the best use of the vertically-oriented display. On the Samsung and Motorola, the top and bottom of the display are blank bands when looking at photos, which seems like a waste of the already-limited screen resolution. Also, not surprisingly, the portrait orientation is better for portraits - that is, pictures of individual people, for things like photo-caller-ID.
As with all of the phones, it's easy enough to turn the camera 90 degrees to take a picture in the other orientation. However, none of the phones can rotate an image after it's been taken. This means if you plan to keep the image in the phone, or send it directly to someone else, you'll need to take it "right-side-up" in the first place.
The Sanyo's color external display is epecially useful in camera mode. When you're in camera mode, you can simply close the flip at any time, and the live viewfinder will automatically transfer the external display, allowing you to take a picture of yourself. It even flips the image horizontally in real-time, so it acts like a mirror, making it much easier to frame the picture.
As mentioned on the previous page, the Sanyo's external LCD is passive, so there is noticeable "smearing" or "ghosting" when moving the camera around to frame a picture. The image is otherwise excellent, though.
When the phone is closed and in standby, a really neat trick is that holding down the camera side key will invoke the camera mode directly, without ever opening the phone. So if you suddenly get the urge to take a picture of yourself, you can actually do that faster than you can open the flip and get to camera mode the usual way.
There are a plethora of relatively advanced options in camera mode. The up and down keys let you adjust the resolution among three sizes (the largest being 640x480). The left and right keys control the digital zoom. The right soft key brings up a menu with additional options.
The first option is the flash, which is always off by default. The flash is actually just a high-powered LED, and has a range of only a few feet. This might seem like a major limitation at first, but the main purpose seems to be for portraits, for things like photo-caller-ID. Since the subject needs to be pretty close anyway to fill the frame correctly, the flash actually works quite well for that purpose. In taking pictures of a few of my friends for photo-caller-ID, a lot of them were taken in dimly-lit bars, and the flash definitely helped.
The second option is self-timer. This is another option that is more useful than you might think. Self-timers are typically intended so that you can include yourself in a scene. In regular cameras, they're typically used with tripods, but of course there is not tripod mount on the 5300. Surprisingly, this is not a problem, because the phone will actually lie on its left side and be quite stable. There's no good way to take a portrait-style picture with the self-timer, but it's still a useful feature.
You can frame the picture first, then press Start and jump in the scene, or you can press Start, close the flip, set down the phone, and get in place, using the external LCD to make sure you're in the frame. A few coins under the edge will let you aim the camera up at an angle, if a flat surface is not available at a suitable height. Of course, this isn't something you'd want to do in public in the city, where someone might grab the phone and run...
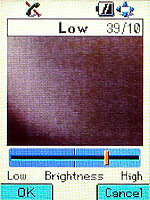
Brightness is the next option. Choosing this will bring up a neat slider control that affects the live image in real time. The Sanyo camera does an impressive job of adjusting for various lighting conditions automatically, but in some especially challenging situations, the brightness control is necessary to get a good a picture. It works extremely well, allowing you to get a great picture in almost any light.
White balance is the next option. Again, the automatic mode works very well. I actually didn't find that I needed to adjust this manually for any picture I took, but it never hurts to have manual controls. There is also an option for color tone, which applies some gimmicky filtering to the image, such as making it black-and-white or negative.
The final option is quality, which has the options "fine" and "normal". This seems to simply adjust the amount of JPEG compression applied to the image. Normal is the default. Normal images take up less room in memory, but appear slightly blurry and have visible compression artifacts, which are especially apparent when viewed at full resolution on a computer. "Fine" images look better, but take up considerably more room in memory.
Once the OK button is pressed, the picture is taken immediately, with almost no lag. The camera also has fast shutter, allowing the phone to capture fast action surprisingly well. Taking pictures from a moving car at 60mph was no problem.
One final note about the Sanyo: the RF part of the phone is switched off when in camera mode, meaning you can't receive a call or message while taking pictures. I suspect this might have to with the amount of power needed for the camera and the live viewfinder. It reconnects to the network when reviewing already-taken pictures, or when you exit camera mode.
Whew - there was a lot of ground to cover with the Sanyo! Fortunately, the rest of the phones are much simpler, so it won't take as long to cover them...
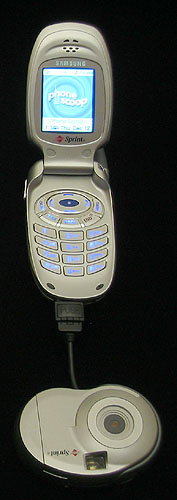
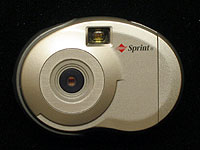
Samsung A500
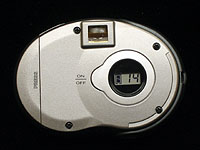
The Samsung's camera is strikingly simple compared to the Sanyo. The camera, manufactured specifically for Sprint PCS by Infohand, is actually a very basic standalone digital camera. Pictures are taken and stored in the camera's 2MB of built-in memory, enough for about 15 photos. There are no options. The interface consists only of an on/off button, a shutter release button, and a small display that shows the number of pictures remaining that can be taken, and the battery level. The fact that it has its own battery is a downside, but it is supposed to last a long time, the battery meter helps, and it is a somewhat standard size available in photo stores or online.
The optical viewfinder works well. It shows a large area, and has brackets that show the area captured, making photos easy to frame. The shutter release is large and easy to press, but also recessed, making it hard to press by accident. The camera is a good size and shape, that makes it easy to hold with one hard or two. It could be a thinner, however. It's roughly the same volume as the Samsung A500, but it is thicker, which makes it slightly less pocketable.
The nice thing about this type of camera is that, like the Sanyo, you can pretty much just pull it out of your pocket and start shooting. As with the Sanyo, this is great for taking spur-of-the-moment photos.
Unfortunately, due to the lack of a live viewfinder, you don't know how well a photo actually turned out until you later connect it to the camera. But the camera did deal with a variety of common lighting situations fairly well. It didn't do well in really low light, sometimes refusing to take a picture at all if the light was too low, but pictures turned out great for most well-lit scenes.
The Infohand camera also works with the Samsung SPH-N400, also from Sprint PCS.
Motorola T720i
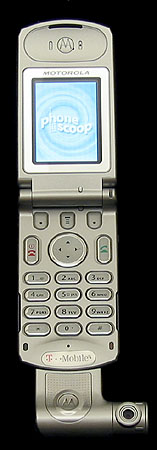
The Motorola T720i is actually just a T720 (GSM) with updated software, and a camera accessory. The camera functions are mostly contained in a Java (J2ME) application, although parts of the phone's main software have also been tweaked to support MMS and integrate with the Java camera application.
Since the hardware is the same as the T720, including the amount of memory, some things were removed in order to make room for the photo functions. While the T720 has 500 phone book entries and POP3 email, T720i only has 100 entries and no email, making room for the camera application and MMS features. Also, the T720i sets aside 500kB for storing photos and ringtones, leaving only 200kB for Java applications.
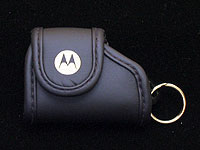
The Motorola camera comes with a well-designed, stylish soft carrying case. The case is essential, because the camera very small and light, and would be easy to lose without it.
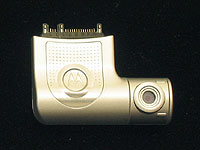
The camera can be a bit tricky to connect to the phone. Sometimes it snaps right in, but other times I found it took some finesse. Also, occasionally it connected physically, but the phone didn't detect the camera properly. When the phone senses that the camera has been attached, it makes a special sound - you have to listen for it to make sure it's really connected.
On a slight tangent, I think this is a problem with attachable phone cameras in general. Any time you have a physical connection that must be handled frequently, it becomes one of the most likely points of failure for the phone. This seems to me like an obvious application for Bluetooth, the sort-range wireless standard use for some headsets. It would be more convenient and more reliable. I completely fail to understand why there is currently only one Bluetooth camera in the world. (A Sony model available only in - you guessed it - Japan.)
Back to the Motorola... Once it is connected, choosing the Picture Messages shortcut launches the Java camera application. In the live viewfinder, the image is much slower to update than the Sanyo, updating only 1-2 times per second. Combined with the added slowness of the passive display, plus the lack of brightness and shadow detail, framing a picture was often a mildly frustrating experience.
The lens on the Motorola camera rotates, a handy feature that lets you take a picture of yourself. It automatically flips the picture when you rotate, so it's always right-side-up. But unlike the Sanyo, it doesn't flip the image horizontally like a mirror when facing you. This makes framing the photo somewhat unintuitive.
The camera sticks out to the right of the phone. Being right-handed, I found this made it very awkward to hold the phone while taking a picture.
There are only a few settings for the user to choose. One is size. The normal size is 340x240, while the small size is 160x120. The other important option is a low light mode. This did help produce a better image in low-light situations.
On quirk of the Motorola is that it "zooms in" a bit just for the live viewfinder, so you see less than will actually be captured. In a way this is nice because it lets you see a bit more detail in the main part of the picture, and it reduces the chance that you'll cut off one part of the picture if your hand moves after you choose "capture". However, I think I might prefer to see an accurate frame and do the corrections myself. It's not a major issue, though - as long as you know what it's doing.
Nokia 7210
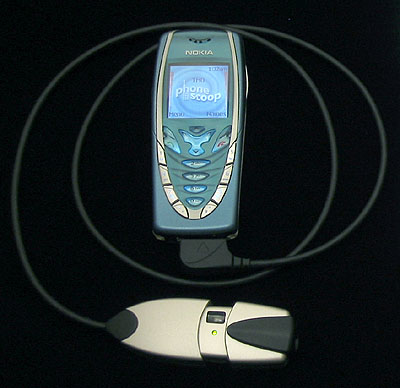
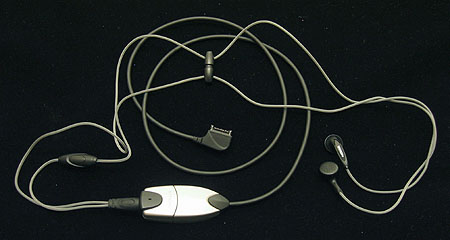
With the Motorola and Samsung solutions, one major drawback is that you have to carry around the camera separately, which obviously is not very convenient. Nokia's solution to this issue is rather clever. The Nokia camera is actually the Nokia Camera Headset. By integrating the camera in an accessory some people carry separately anyway, the camera is less of a hassle.
The headset includes convenient features such as a talk button in the wire, and clips to connect the wires behind you neck, so you can hang the camera part and wear it like a necklace. The earbud wires connect to the camera with a twist-lock connector, so it won't come unplugged accidentally. The camera also sports a built-in pocket clip, for clipping the camera to a shirt pocket or lapel. This is especially useful because the camera contains the microphone.
Furthermore, some people will be more likely to carry the headset because the 7210 has a built-in FM radio, and the headset is required (as an antenna) for that feature to work. On the other hand, some people might be less likely to carry the headset, because the 7210 also includes an excellent speakerphone function.
The camera can also be separated from the headset, and used as a standalone attachable camera. The camera connects to the phone via a 33-inch long cable, instead of attaching directly like the Motorola. This makes using the camera a two-handed affair, or requires you to juggle between the two, since you need to use the phone to save a picture after it's been taken. The connector uses Nokia's new Pop-Port interface.
Like the Motorola, the Nokia camera has no internal memory to store photos. Photos are sent immediately to the phone for saving.
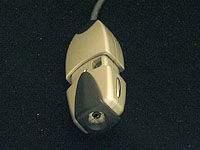
Unlike the Motorola, the Nokia does not provide a live viewfinder on the display. Instead, an optical viewfinder is located on the camera. Unfortunately, the viewfinder is nearly useless. The image is distorted and blurry toward the edges, and you can't see the whole image at once. There are no brackets like on the Sprint phone to show you the area captured. Framing pictures through the viewfinder proved nearly impossible. Most of my attempts were off by a good margin, cutting off parts of the scene. It came down to trial-and-error in most cases, and sometimes I even found I could get better accuracy just by holding the camera and pointing it, without using the viewfinder at all.
On the plus side, the Nokia doesn't require you to navigate to any special camera application or menu. You simply take a picture, and a picture inbox automatically pops up on the phone display. You then have the option to view and save or delete photos received from the camera. You can take multiple photos in a row, and then go back and handle them when you're done.
One major flaw with this process is that you are required to name each photo file before saving it. T9 predictive text entry is not available when naming files, and the default name is "File0", which means you must rename each photo or it can't be saved, because that file name is already used. All of the other phones name photos automatically with unique file names.
(My 7210 came with software version 3.09. Later versions, such as 4.18, may correct these issues.)
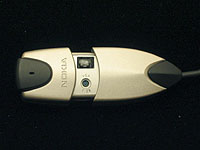
Another gripe about the Nokia camera is that the shutter-release button is too easy to press by accident. The camera is so small that there aren't many places to put your fingertips, and the button sticks out and depresses easily. Even after a week of solid daily use, I still found myself taking pictures by accident, which then required fiddling with the phone to delete the unwanted photos.
Finally, I found that the camera and phone frequently just stopped talking to each other. The camera has a light on it that goes off briefly when it takes a picture, and flashes when transferring a picture. Quite often I would take a picture and the light would go off, but it would not flash - it would not transfer the picture to the phone. Re-connecting the camera to phone usually solved the problem. This may have been a software glitch fixed in later versions, or it may simply have been a bad connector. Hopefully this is not a sign of things to come with the Pop-Port connector. (Once again, Bluetooth would make a lot of sense for this.)
The Nokia Camera headset is also compatible with several other Nokia models with the Pop-Port interface.
 iPhone 14 Plus Offers a Big Screen For Less
 iPhone 15 Series Goes All-In on USB-C and Dynamic Island
 Asus Zenfone 8 is a Compact Flagship
 iPhone 13 Upgrades Cameras, Displays
 Samsung Galaxy A53 Coming to US in Two Weeks